
A strange-looking tray is not always a failed tray.
A tray can look fine at breakfast and oddly droopy by dinner: pale stems leaning sideways, seed hulls stuck to leaves, a patch that looks a little too fuzzy. Microgreens move quickly because they are tiny, crowded, and growing in a shallow layer of media. Fast change is normal—and so is a little beginner doubt.
The first useful response is to pause and look closely before spraying, rinsing, scraping, or tossing the whole tray. Many problems leave clues: smell, texture, color, where the patch appears, and whether it spreads. A tray that seems dramatic under dim kitchen light may look much less alarming after airflow improves or the blackout cover comes off. Caution matters, but panic rarely helps.
- A sour or swampy smell is more concerning than a plain earthy smell.
- Bright white fuzz around roots can be harmless root hairs; gray, colored, or spreading fuzz deserves more caution.
- One bad corner does not always mean the whole tray has failed.
A Calm First Pass Before Changing Anything
-
Look back at germination
Many tray problems start before the greens are visible. Uneven sprouting, clumped seed, old seed, or a blackout period that ran too wet can lead to patchy growth later.
-
Check moisture without adding more water
The surface may look dry while the mat underneath is soggy. Lifting the tray, touching the underside of the grow mat, or checking for pooled water gives a better clue than guessing from the top alone.
-
Smell and inspect airflow
A fresh tray usually smells green or earthy. Sour, swampy, or stale odors often point to poor air movement, excess moisture, or decaying seed hulls.
-
Compare light and stretch
Long, pale stems usually suggest the crop is reaching for light or stayed covered too long. Crispy tips or sudden collapse can point to heat, intense light, or drying out.
-
Scan for contamination or pests
Fuzzy growth, sticky patches, tiny moving specks, or chewed-looking leaves deserve a closer look before watering, feeding, or misting again.
Changing several things at once can make a weak tray harder to read. A heavy misting, brighter lamp, fan blast, and extra rinse may all seem helpful, but together they can stress seedlings and hide the original cause.
Most beginner tray failures trace back to one of a few areas: germination, moisture, airflow, light, contamination, or pests. One small adjustment, followed by a few hours of observation, often gives clearer clues than a full rescue attempt.
When an Early Tray Looks Rough
A struggling tray is not automatically a failed tray. In the first few days, microgreens can look uneven, pale, or a little dramatic while seeds wake up at different speeds. The useful question is whether the tray is still moving in a healthy direction.
Signs that a tray may be worth adjusting include:
- Some seeds are sprouting, even if the stand is patchy.
- The medium is damp but not sour-smelling.
- Stems perk up after light or airflow improves.
- Yellow shoots begin greening within a day after blackout ends.
Small corrections often help at this stage: drain standing water, uncover the tray sooner, add gentle airflow nearby, or move it closer to a light. A tray with dry edges and a wet center may simply need more even watering rather than a full restart.
A tray is less promising when most seeds never swell or split, the surface smells rotten, slimy patches spread quickly, or seedlings collapse in clusters. Those signs usually point to seed quality, too much moisture, poor airflow, or contamination. Saving one tiny corner can be satisfying, but beginners may learn more by noting what happened and starting a cleaner, lighter-watered tray next time.
Mold: When to worry and when to breathe
Mold is one of the easiest problems to overread, especially on radish, broccoli, and other fast-sprouting trays. Root hairs often look like a pale halo around each seedling, appear mostly near the roots, and look fairly even across the tray. They do not usually smell bad, and they often seem to shrink back after a light misting.
Mold behaves differently. It tends to look webby or patchy, creeps across the growing medium, bridges between seedlings, or returns thicker after being wiped away. A musty, sour, rotten, or “old towel” smell is a stronger warning sign than appearance alone. Colored growth, slimy stems, collapsed patches, or fuzz that keeps spreading are good reasons to stop treating the tray as normal.
When mold shows up again and again, the tray is usually not the whole story. The pattern often points to a growing setup that stays too damp, too still, or too crowded.
Common causes include:
- Poor airflow, especially during blackout or after watering
- High humidity around trays with no dry-down period
- Heavy seed density that traps moisture between stems
- Top watering too often, leaving seed coats and media wet
- Unwashed trays or tools carrying residue into the next batch
A single fuzzy spot can sometimes be removed for observation, but spreading mold plus bad odor is different. In that case, discarding the tray can be the calmer choice than trying to rescue questionable greens.
A food-safe rinse or treatment may help in limited cases, but it does not solve stale air, wet media, dirty trays, or crowded seed. If the crop is slimy, smelly, or visibly declining, treatment is unlikely to make it feel trustworthy.
Reading a wilted tray without overreacting
Wilting is a clue, not a command to add water. A dry tray often has light, papery medium and seedlings that perk up after careful bottom watering. An overwatered tray feels heavy, cool, and spongy; leaves may look limp even though plenty of moisture is present.
Look at the pattern before acting. Limp leaves across the whole tray can point to heat, strong light, or a missed watering. Falling stems often come from weak, stretched growth, shallow roots, or too much moisture at the base. Collapsed patches are more concerning, especially when stems look pinched, glassy, or darker near the soil line.
A cautious rescue keeps the problem contained:
- Stop misting the canopy for the moment.
- Tip or lift the tray so excess water can drain away.
- Increase gentle airflow, not a harsh blast.
- Remove slimy or collapsed clumps with clean tweezers.
- Keep tools away from healthy trays until washed.
If the medium smells sour or rotten, or collapse keeps spreading after drying improves, the tray may not be worth saving.
Do not fluff or stir a soggy tray to “air it out.” That can spread damaged tissue and spores through the crop. Surface drying and targeted removal are usually gentler first steps.
Yellow After Blackout, or Getting Leggy?
Microgreens often come out of blackout looking yellow, bent, and slightly dramatic. That is usually just a light delay: the stems have been reaching in darkness, and the leaves have not greened up yet. After several hours under a suitable grow light, many trays begin shifting from yellow to pale green, then brighter green.
Trouble is more likely when the tray keeps stretching upward while the leaves stay pale. Long, thin stems are a sign that light is not reaching the crop strongly enough, soon enough, or evenly enough. If the stems weaken before the leaves fill out, the tray may turn leggy and start leaning or flopping.
Common causes include:
- Blackout ran too long: stems stretch before light arrives.
- Light sits too far away: seedlings keep reaching instead of thickening.
- Crowding is heavy: plants compete and shade each other early.
- Light coverage is uneven: one side leans toward the stronger area.
A gentle correction can help: bring the light closer if heat is not building, end blackout a little earlier on the next tray, and seed less densely for crops that always stretch. The goal is sturdy, upright growth—not maximum height.
The Room May Be the Hidden Problem
Repeat tray problems often come from the space around the greens, not from a single mistake. A room that feels comfortable to people can still be too still, too damp, too hot near a window, or too cold overnight for a shallow tray of seedlings.
Gentle airflow is one of the simplest fixes. The goal is not to blast the greens, but to keep air from sitting heavy over wet stems and soil. A small fan across the room, set low, can help leaves dry between waterings and make fuzzy growth less inviting.
Humidity matters too. If condensation appears on lids, shelves, or nearby walls, the setup may be holding more moisture than the trays need. More space between trays, cracked lids after germination, and bottom watering can all reduce that damp pocket around the crop.
Extremes tend to show up as repeated mysteries: trays drying overnight, stems leaning away from heat, slow sprouting in a chilly corner, or mold returning despite careful cleaning. If the same issue keeps appearing, optional tools such as a basic thermometer, hygrometer, clip fan, or small dehumidifier can make the room easier to understand.
A simple test: place a dry hand near the tray surface. Air should feel barely moving, not windy, and the tray area should not feel muggy or sharply cold.
Algae and Tiny Flies Aren’t Always a Disaster
A green slick on the surface usually points to light plus steady moisture, especially on exposed coco coir, soil, or paper mats. It looks alarming, but it does not automatically mean the crop is ruined. Check whether the tray stays wet between waterings, whether puddles sit in low corners, and whether seeds were spread thin enough to leave damp medium exposed.
Tiny flies often tell a similar story: something nearby is staying moist and organic. The source may be the microgreens tray, but it may also be a houseplant, compost pail, old seed hulls, or spilled medium under the shelf.
A practical first pass:
- Let the surface dry slightly between bottom waterings.
- Remove loose hulls and decaying bits.
- Improve gentle airflow without blasting seedlings.
- Check nearby plants and damp clutter.
- Cover exposed medium more evenly on the next tray.
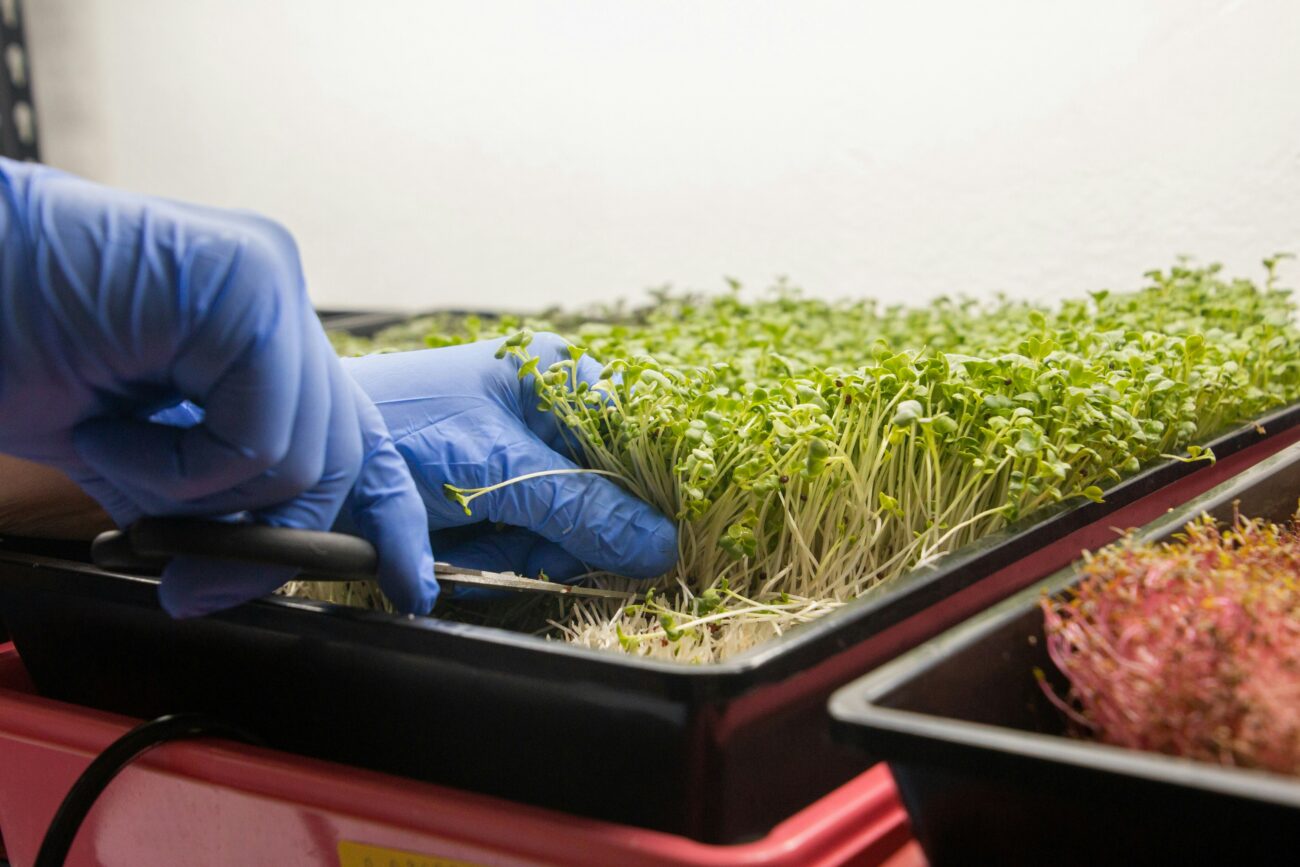
Turn One Bad Tray Into a Better Next Tray
-
Clear the tray without drama
A failed tray is not wasted if it leaves behind clues. Remove the crop, discard spoiled media, and note anything obvious first: sour smell, slimy spots, dry edges, heavy algae, or patchy germination.
-
Clean the gear before guessing again
Wash trays, lids, and tools with warm soapy water, then let them dry fully. If a grower normally sanitizes equipment, this is the moment to do it rather than carrying the same problem forward.
-
Write down the basics
Keep notes short enough to repeat: seed type, sowing date, soak time if used, blackout length, watering style, light timing, and harvest or failure date. A phone note, spreadsheet, or paper card all work.
-
Add the room clues
Record anything that may have shaped the tray: cool nights, a closed window, a crowded shelf, unusually damp weather, a fan moved away, or nearby houseplants with gnats.
-
Change only one or two things next time
Big resets make results harder to read. A clearer next attempt might adjust seed density and airflow, or watering and blackout length, while leaving the rest mostly familiar.
- Short notes make repeat problems easier to spot than memory alone.
- A failed tray can point to timing, moisture, airflow, sanitation, or seed-specific quirks.
- Small changes create cleaner lessons than a complete overhaul every round.
Microgreens troubleshooting gets easier when each tray becomes part of a simple record. The goal is not perfect tracking; it is noticing patterns early enough that the next tray starts with fewer unknowns.
A rough harvest, a moldy corner, or a tray that never sprouted evenly can still be useful. With a quick clean-up, a few notes, and one modest adjustment, failure turns into practical experience instead of frustration.
I’m still confused about mold vs root hairs. Every beginner video says “don’t worry it’s root hairs” and then the next video says “that’s mold, throw it out.” 😅
Is the main difference that root hairs stay close to each seed, while mold spreads across the tray?
Could you clarify the yellow-after-blackout thing? Mine come out looking like tiny ghosts, then green up after a day under lights, so I assumed that was normal.
But I also get leggy broccoli sometimes, and I’m not sure where the line is between “normal yellow” and “you waited too long, buddy.”
I appreciate the calm approach, but I’m skeptical about saving wilted trays. Once mine droop, they never really bounce back evenly.
Are there crops that are just less forgiving? Sunflower seems dramatic for me, like it faints if I look at it wrong.