
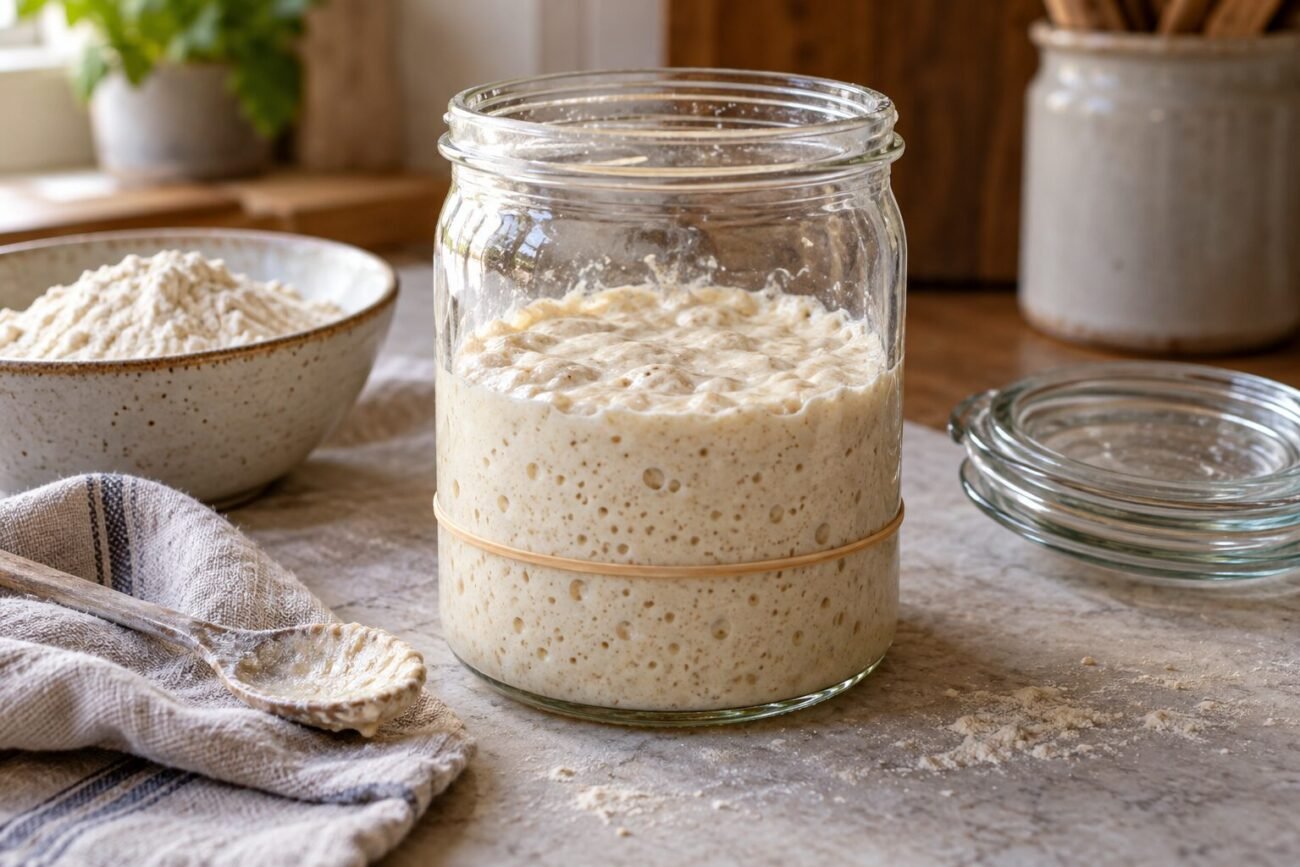
A sourdough starter usually needs steadiness more than perfection.
Have you ever stared at a jar and wondered whether one bubble means progress or whether you’ve just wasted flour again? I have, and that’s often when sourdough advice starts to sound like a lab manual: exact temperatures, special flours, strict schedules, zero mistakes allowed. In real kitchens, it’s usually much less dramatic than that.
What helped me was treating a starter like a small daily habit, not an exam I could fail. Mix, wait, notice, repeat. Some days it looks active; some days it seems sleepy. That doesn’t automatically mean it’s ruined or that you did something wrong. A simple flour-and-water routine can carry you surprisingly far, and a little patience often saves more flour than panicking, changing everything, or starting over too soon.
What a starter really is
To me, a sourdough starter is just flour and water that have turned into a small, living culture of wild yeast and bacteria. Those microbes eat, multiply, and create the rise and tang that make sourdough work.
A few things matter more than almost everything else:
- Consistency: feed on a repeatable schedule, even if it’s very simple.
- Warmth: a comfortably warm spot can help activity show up sooner.
- Observation: I look for bubbles, a mild tangy smell, and some rise after feeding.
- Patience: some starters wake up quickly; others stay quiet for a few days.
A lot of the rest is optional tinkering: exact jar shape, precise ratios, special flours, filtered water, pineapple juice, named methods. Those can be interesting, but in my experience they matter less than doing the same basic thing for several days in a row.
A starter usually responds better to a calm routine than constant adjustments. If I can stay consistent, it becomes much easier to tell what’s actually changing.
Use simple tools and ordinary flour
Here’s the setup I use when I want to keep things simple. A clean jar, a spoon or spatula, a kitchen scale if I have one, and some flour and water are enough. If I don’t have a scale, I can still start with small, roughly equal spoonfuls and adjust until the mixture looks like thick pancake batter.
For flour, I try not to overthink it. Plain all-purpose flour can work just fine; whole wheat or rye often wake things up faster because they bring more nutrients and microbes to the mix. If you want to pick a flour that gives a starter a stronger start, it helps to think of flour as a speed choice, not a pass-or-fail one.
A rubber band on the jar helps me notice rise, but even that’s optional. I don’t need special crocks, filtered water, or a starter kit to begin.
Make the first mix
I mix a small spoonful each of flour and water into a thick, shaggy paste. A jar mark helps tiny rises show.
Judging thickness by eye
Survival HT makes the texture easy to picture.
Expect a weird first couple of days
Expect a weird start
In the first day or two, a starter can look dramatically alive and then oddly quiet. I’ve had jars throw off bubbles, rise fast, and smell sharp within 24 hours, only to seem flat the next day. That early burst is usually a false start: different microbes are reacting before the more stable sourdough community settles in.
So if I see bubbles right away, I don’t treat that as maturity yet. And if day two or three feels like a slump, I don’t assume it failed either. What matters more is the pattern over several feedings:
- the mixture starts rising after feeding, even a little
- the smell shifts from harsh or funky toward tangy or yeasty
- bubbles show up through the jar, not just on the surface
I try to keep feeding on schedule and observing, not fixing it every few hours. A quiet phase can be completely normal.
A fast rise on day one often looks exciting, but it usually doesn’t mean the starter is ready to bake with yet.
My easy once-a-day feeding rhythm
-
Start with a spoonful
I keep only a small seed culture in the jar—about 1 tablespoon. A tiny starter is easier to wake up and costs much less flour.
-
Discard most of it
Before feeding, I tip out all but that small amount. Discarding is not a mistake; it keeps the jar from growing into a flour-hungry monster.
-
Feed with fresh flour and water
I add roughly equal spoonfuls of flour and water until it looks like a thick batter again. It does not need to be mathematically perfect every day.
-
Mix, mark, and wait
I stir well, scrape down the sides, and mark the level. Then I leave it alone until the next day and look for small signs of lift and bubbles.
-
Repeat on the same schedule
A simple 24-hour rhythm is usually enough while the culture is getting established. Consistency tends to matter more than chasing exact ratios.
What I’m really doing each day is giving a small living sample fresh food. That mindset makes feeding feel lighter: less flour, less mess, and fewer chances to overthink it.
Before I Assume Something Is Wrong
Quiet stretches are common, especially after the early burst fades.
If your starter still isn’t bubbling much, I usually check warmth and timing first. A slightly warmer spot and a few consistent feeds often change the picture.
That smell often means the starter is simply hungry.
When mine gets harsh or solvent-like, a regular feeding—or a slightly larger one—often brings it back to a milder, yeasty smell within a day or two.
Those signs are different from normal sourdough weirdness and usually mean starting over is safer.
A rough smell, hooch, or uneven bubbles can happen. Colored growth or fuzz is the main thing I treat as a real problem rather than a patience problem.
Very large feeds can dilute activity as easily as they help.
If mine seems sleepy, I get better results from steadier timing, modest feeds, and a warm spot than from suddenly making the jar much bigger.
A starter can smell sour, fruity, cheesy, or briefly a little harsh while it finds its rhythm. What I watch for is trend: more predictable rise, broader bubbles, and a smell that shifts rather than stalls.
Know when it’s actually ready
I stop watching the calendar at this point and start watching for repeatable behavior. A starter can look lively once because the room was warm; what matters more is whether it does roughly the same thing several feedings in a row.
Signs I look for:
- Rises predictably after a feeding, often close to doubling in 4–8 hours in a warm spot
- Falls back gradually, leaving streaks on the jar
- Has bubbles throughout, not just a few on the surface
- Smells pleasantly tangy, yeasty, or a little fruity rather than harsh
If mine can do that for two or three days running, I treat it as active enough to try. From there, the next useful question is how it behaves right after a feeding and whether that rise is strong enough for baking.
Keep it on the schedule you’ll actually use
Once mine is established, I stop treating it like a daily project. If I bake several times a week, I keep it at room temperature and feed it once a day. If I bake weekly or less, I refrigerate it after a feeding and refresh it the day before I want to mix dough.
Discard doesn’t need to become a side quest. I usually compost it or toss a small amount, especially when the starter is young; later, I save some if I feel like making pancakes or crackers.
A simple rhythm helps more than a perfect one. After that first solid week, starter care usually feels much easier and far less mysterious.
Match upkeep to your baking rhythm: room temperature for frequent baking, fridge storage for occasional baking. Discard can stay simple, and the process usually feels much more manageable once the starter has made it through its first successful week.

The fridge schedule part was what I needed. I only bake every couple of weeks, and most sourdough advice makes it sound like you need to care for this thing like a Victorian orphan.
Good reminder that the schedule should match real life.
Appreciated the part about the weird first couple of days. Every other guide acts like if it doesn’t double immediately you have somehow failed as a person.
My starter had that dramatic early burst on day 2, then absolutely nothing for what felt like forever. I almost dumped it, mostly out of annoyance and not science. Stuck with the once-a-day rhythm and regular flour, and it finally turned the corner around day 7 or 8.
The note about not restarting too fast probably saved me a lot of flour.
Step where you said the first mix should stay small and thick tripped me up a bit.
I think I made mine too thick, like actual paste, and it barely had any visible bubbles even after a few days. I did mark the jar like you suggested, which was helpful because it HAD moved a tiny bit, but not much. Should it be thick enough to hold shape for a second, or more like pancake batter?
A very stiff paste can slow things down, especially early on. I aim for something thicker than pancake batter but still easy to stir—more like a thick muffin batter or soft paste that settles into the jar rather than standing up in peaks.
If yours is truly hard to stir, just add a small splash more water at the next feeding. The jar mark was a smart move; tiny movement still counts as activity.
I did the exact same thing lol. Mine was basically wallpaper paste.
When I loosened it just a little, I started getting better bubbling within 2 days.
I like the low-fuss approach, but I’m still skeptical about the “approximate feeding” part.
When people say consistency matters more than strict ratios, does that still hold if my kitchen temp swings all over the place? Mine is 66F in the morning and like 75F by late afternoon, and the starter goes from sleepy to super hungry fast. I’m trying not to overcomplicate it… while also apparently overcomplicating it 😂
Yes—within reason, that still holds. Temperature swings will change speed more than they change the basic process, so a cooler morning and warmer afternoon usually means the starter may peak a bit sooner or smell hungrier by the next feeding.
In a variable kitchen, I’d focus on keeping your routine mostly the same and watching the culture itself: rise, bubbles, aroma, and how quickly it falls. If it seems ravenous and collapses early every day, you can either feed a bit earlier or make the feed slightly larger. You don’t need perfect math; you need a repeatable pattern you can observe.
My kitchen does this too. I stopped chasing exact numbers and just moved the jar away from the drafty window, which weirdly fixed half the problem.
This was the first sourdough article I’ve read that didn’t make me feel like I needed a lab coat 😅
Keeping the starter small and feeding once a day at roughly the same time helped way more than all the ratio math I was trying before. Mine looked dead on day 4, smelled kinda like yogurt and apples on day 6, and by day 8 it was finally rising in a predictable way. Baked with it this weekend and it actually worked!
The section about colored growth being the real red flag was useful.
I threw out a previous starter because it smelled sharp and gross, but now I’m realizing it may have just been hungry, not doomed. Wish I’d read this before sending a cup of flour to the trash can graveyard.