
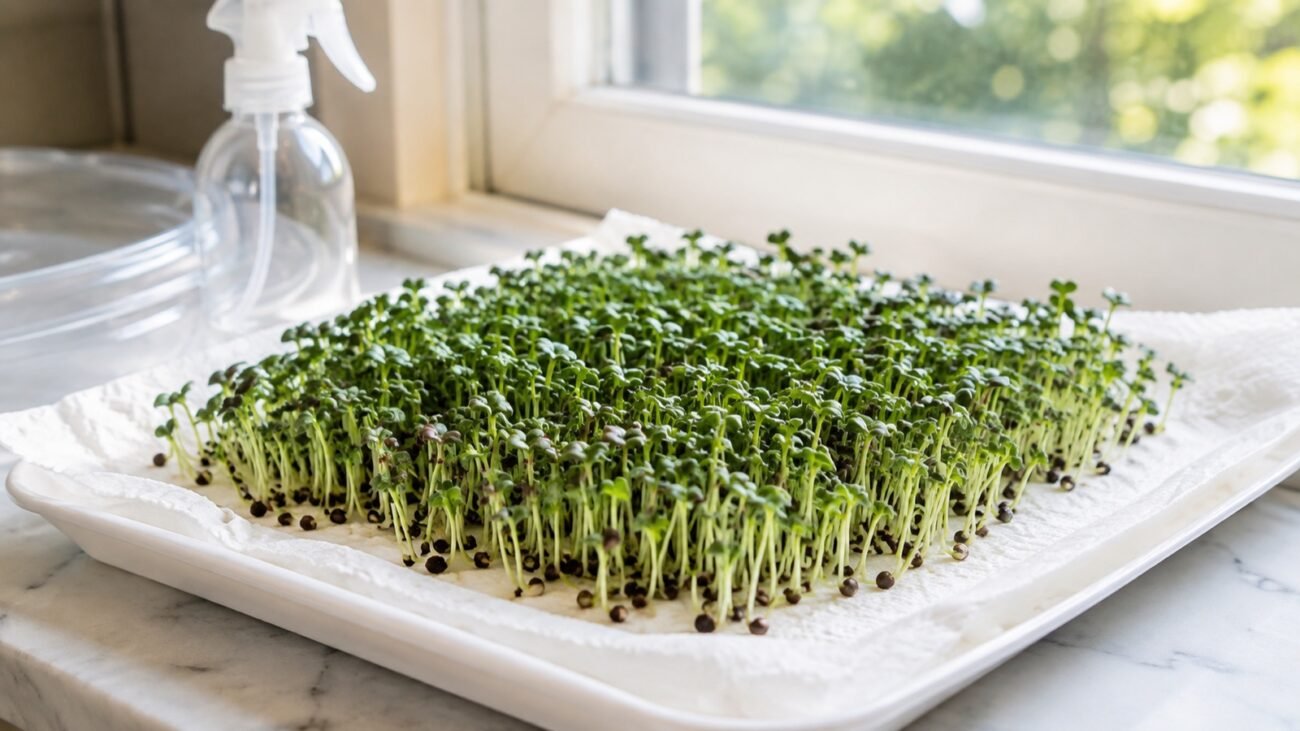
Fresh greens can start on a damp towel, not a shelf of equipment.
A windowsill, a takeout lid, and a pinch of seed are enough to test the habit without bringing potting mix into a tiny kitchen. Paper towel growing keeps the first batch low-risk: moisture is visible, cleanup is quick, and small mistakes cost very little. For broader basics, see this beginner-friendly microgreens guide.


What paper towel can and cannot do
Paper towel is a handy starting surface because it is clean, flat, and easy to replace. It lets seeds stay in close contact with moisture, which is often enough for quick microgreens such as radish, broccoli, mustard, or cress.
Its main weakness is capacity. A towel holds only a small reserve of water, so it can dry out faster than soil, coco coir, or a thicker growing mat. It also offers almost no nutrients, which is usually fine for very young greens harvested soon after sprouting, but less helpful for slower crops.
This tradeoff makes steady moisture more important than extra equipment. The towel should feel damp, not flooded; standing water can make stems weak and encourage sour smells. Anyone deciding whether to continue with this method may find it useful to compare paper towel with soil and hydroponic growing before choosing a setup.
Gentle handling matters too. Wet paper tears easily, and tangled roots can cling to the fibers at harvest.
A lightly misted towel is usually easier to manage than one sitting in a puddle. If the surface looks shiny with water, draining or blotting a little can help keep the tray fresher.
Gather a simple, clean growing station
-
Start with a shallow base
A dinner plate, takeout lid, baking tray, or clean food container works as long as it is shallow and easy to rinse. A low rim helps contain water without hiding what is happening on the towel.
-
Use plain paper towel
Choose an unscented, dye-free towel and fold it to fit the tray. It should sit flat, with no thick ridges where seeds can bunch up or stay overly wet.
-
Add a gentle watering tool
A spray bottle makes even misting simple, but a teaspoon or small cup can also work with a careful hand. Easy moisture checks matter more than special equipment in a tidy indoor microgreens setup.
-
Cover loosely during germination
A second plate, clear lid, or piece of plastic wrap with a small gap can slow drying while seeds wake up. The cover should be easy to lift for quick airflow and moisture checks.
-
Keep upgrades optional
Labels, a clear humidity dome, or a mesh insert can make the process neater, especially for repeat batches. Clean materials, shallow drainage control, and daily observation are the real essentials.
Wash reusable trays and lids with warm, soapy water before starting, then rinse well.
Choose forgiving seeds first
For a first paper towel tray, small brassica seeds are usually the most forgiving. Broccoli, kale, cabbage, kohlrabi, mustard, and arugula sprout quickly, spread evenly, and do not need much space before harvest. Their fine roots also grip the damp towel without becoming too bulky.
Large seeds can work, but they are less beginner-friendly in this setup. Peas, sunflower, and wheatgrass need more water, more airflow, and often a deeper growing surface. On a thin towel, they can dry out at the edges or push themselves around as they swell.
Gel-forming seeds, such as chia, basil, and flax, can be tricky too. When wet, they create a slick coating that may hold too much moisture against the seed. That can make the tray harder to rinse, drain, and keep fresh.
Brassica-heavy starter blend
This 1 lb non-GMO mix includes broccoli, kale, kohlrabi, cabbage, and arugula—all small-seeded greens that suit shallow paper towel trays better than many larger crops. The listing describes it as a high-germination blend for indoor trays, hydroponics, and home gardening, with typical microgreen harvests in about 7–10 days.
Because it is a bulk pouch, it may make sense for repeat growing rather than a single trial tray.
Pick one small-seeded crop or a brassica-based salad mix, then sow lightly enough that seeds sit in a single layer. Crowded seeds trap moisture, tangle roots, and make paper towel trays harder to keep clean.
Set the towel and seeds
-
Lay the towel flat
Use one or two layers. Smooth wrinkles so roots meet damp paper, not air pockets.
-
Moisten, then drain
The towel should feel evenly damp and shiny, with no standing water.
-
Scatter a thin carpet
Aim for dense coverage, but avoid seed piles; clumps stay wet and turn musty.
-
Keep the tray level
A level tray prevents pooling, weak rooting, and uneven sprouting.
Paper towel microgreens setup
WaterWorx Vege Garden shows a full paper-towel grow from seed to harvest, useful for seeing the damp-but-not-flooded setup in action.
After pressing the towel, fingertips should come away damp, not dripping. If seeds float or slide, there is too much water.
Use darkness only until the seeds wake up
A short blackout phase gives newly watered seeds a calm, humid start. It is less a strict rule than a simple way to keep light, drafts, and quick drying from interfering while the seed coat softens.
Cover the tray with another tray, a plate, or a loose lid. The cover should block most light but still allow a little air exchange. If the towel looks dry at the edges, mist lightly rather than soaking the tray.
Visual cues matter more than the clock. The cover can usually come off when many seeds show tiny white roots and the sprouts begin pushing upward. At that point, light helps them green up instead of stretching pale and weak.
A gentle weight can improve contact between seeds and the damp towel, especially during the first day. Once sprouts start lifting the cover, remove the weight so stems can straighten without being pressed.
A light empty tray is usually enough. Heavy books or firm pressure can crush tender sprouts or squeeze too much moisture into one spot.
Move sprouts into light and manage moisture
Once the sprouts have lifted and look pale yellow, the tray can move into bright, indirect light. A windowsill with gentle morning sun often works, but harsh midday sun can heat the tray and dry the towel surprisingly fast. A small grow light also works well when kept close enough to brighten the greens without warming them.
The daily rhythm is simple: check the towel, mist or add water as needed, then let excess moisture drain away. The towel should feel evenly damp, not dripping. If water beads around the stems or collects in the tray, tilt it off or dab the corner with a clean towel.
Most paper towel batches struggle for one of two reasons: the roots dry out, or the tray stays soggy. Dry towels cause tiny roots to stall and cling to the paper. Soggy trays can smell musty and make stems weak or floppy.
A small spray bottle gives gentle control, especially during the first day in light. For a deeper drink, water can be added along the tray edge so it wicks through the towel from below. This keeps seeds from shifting and follows the same idea as watering paper towel trays without flooding them.
Press one clean fingertip near the towel edge. If it feels cool and damp, leave it alone for now. If it feels dry or papery, add a little water. If it shines or puddles, remove the excess.
Early Problems That Are Usually Easy to Fix
It may be harmless root hairs, especially if it hugs the root like a soft halo and disappears when misted.
Smell the tray and check the towel. Fresh, earthy growth is usually fine; sour odor, slimy patches, or fuzzy growth spreading across seeds points to too much moisture or poor sanitation. Remove badly affected clumps, improve airflow, and start cleaner next time if mold keeps returning.
They are probably stretching for light, or the cover stayed on a little too long.
Move the tray to brighter indirect light or a gentle grow light, and rotate it once a day. Remove any blackout cover once most seeds have rooted and begun lifting.
Pale yellow is common right after blackout because the greens have not had much light yet.
Give them a day or two in bright, indirect light. If they stay yellow while the towel is soaked or cold, reduce excess water and move the tray to a steadier room-temperature spot.
The surface may be drying unevenly, or air may not be moving enough around crowded sprouts.
Mist stuck hulls lightly and let them soften before gently brushing loose. Add small amounts of water at the towel edge for dry corners, not a flood through the middle. If the tray smells trapped, lift the cover higher, space future seedings more lightly, and avoid sealing the tray airtight.
Harvest, clean up, and decide what comes next
Most paper-towel microgreens are ready when the seed leaves are open and the stems look sturdy, often around 7–12 days depending on the seed and room conditions. A small taste test helps: tender, fresh, and mild usually means the tray is ready.
For a clean harvest, lift a small bunch and snip above the towel line with clean scissors. Avoid scraping the towel or pulling roots through the greens, since damp fibers and hulls can cling to the crop. Any remaining roots, towel, and hulls can go into compost where accepted, or into the trash.
After one tray, simple notes are useful: seed type, soak or no soak, watering rhythm, light source, and harvest day. One small test tray keeps the learning cheap and low-pressure. If the process feels enjoyable, a fitted tray or microgreen mat that simplifies cleanup can be a sensible next step rather than a required purchase.
A paper towel tray is a small experiment, not a permanent setup. Clean cutting, quick cleanup, and a few notes make the next round easier to adjust.
If growing microgreens becomes a habit, biodegradable mats or simple trays can make the routine tidier while keeping the same basic method.

I had trouble with stuck hulls on kale microgreens. They germinated fine and the towel stayed damp, but a lot of the seed coats were still hanging on at harvest time.
Would more moisture during blackout help, or is that more about seed density?
Stuck hulls can happen from either slightly dry germination conditions or seeds sitting too crowded. For kale, try a lighter seed layer next time and keep the towel evenly damp during blackout, especially along the edges.
You can also place a loose cover over them for the first day after uncovering to keep humidity up, but remove it if you notice stale smell or condensation pooling.
Tried this with broccoli seeds after reading the “forgiving seeds first” part and it actually worked! I used a takeout container lid as the tray and 2 layers of plain paper towel.
Day 2 looked like creepy little white fuzz and I almost tossed it, but your note about root hairs saved the batch. By day 6 they were on avocado toast, very fancy for something grown on trash-adjacent materials 😂
The darkness step confused me a bit. I left the cover on until day 4 because I thought they needed blackout longer, and now my radish sprouts are super tall and floppy.
Should I just harvest early or is there a way to strengthen them once they’ve gone leggy?
They may still be usable, just not as sturdy as a batch moved into light sooner. Once roots show and the sprouts start lifting, remove the cover and give them bright indirect light or a grow light right away.
For this tray, uncover them now, keep the towel damp but not soggy, and rotate the tray if they lean. If they smell fresh, you can still harvest them early.
I like the paper towel method for testing old seeds before wasting a whole tray. My arugula packet from 2021 had maybe half germination, so this saved me from pretending it was going to be a lush harvest.
Also big yes to taking notes. I never remember what I did unless I write “too wet, smelled like basement” in my phone.
This worked for my kids’ little science project. We used mustard seeds, a shallow plastic tray, and another tray flipped over for the blackout.
The best part was seeing how fast they changed once we moved them into light. They went from sad yellow noodles to actual green plants in like a day. My 8 year old now thinks we’re farmers.
Not totally sold on paper towels for regular growing. It was fine for a first try, but the moisture control felt fussy and the towel tore when I harvested.
That said, it was a cheap way to see if I even liked growing microgreens before buying mats or trays. I’ll probably upgrade but keep this method for small test batches.
I appreciate the honest “paper towel can and cannot do” section. A lot of tutorials make it sound like paper towels are magic farming technology, but mine dried out twice in one afternoon near a sunny window.
Moving it away from the glass and misting the edges separately helped a ton.
Has anyone had luck with basil on paper towel? Mine made that gel coating and became impossible to spread. I saw the warning about gel-forming seeds but decided I was smarter than the article. Spoiler: I was not.
Basil was a mess for me too. I’ve had much better luck with broccoli, cabbage, and mustard on towels. For basil, I switched to a hemp mat because the gel doesn’t slide around as badly.