
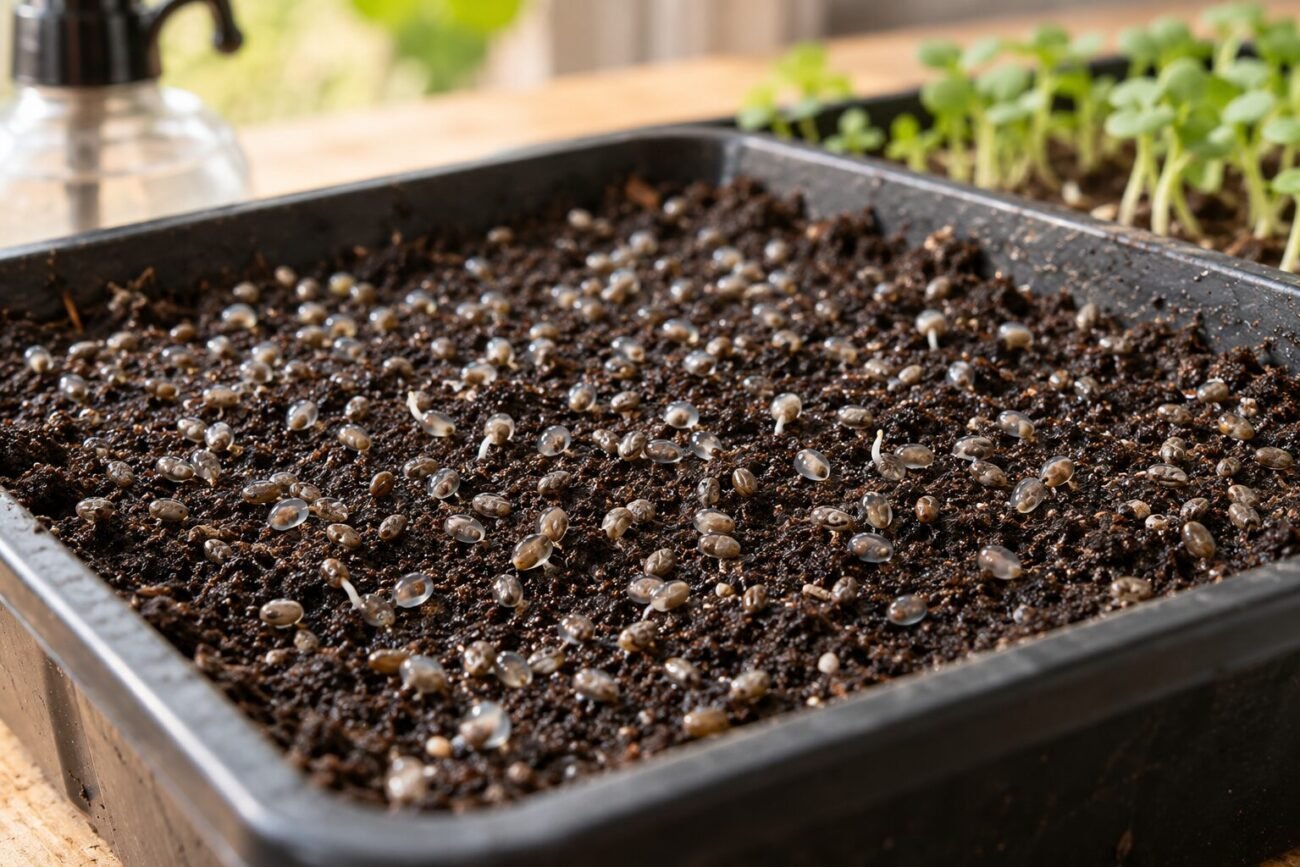
Some seeds can turn a perfectly normal tray routine into a sticky surprise overnight.
Have you ever lifted the dome and found a slick, jelly-like layer where you expected an even little carpet of sprouts? The first time it happened to me, I assumed I had overwatered, used old seed, or somehow caused a mold disaster.
With mucilaginous seeds, that slimy coating is often just part of the seed waking up. Once wet, they form a gel, and my usual tray habits can suddenly lead to clumps, bare patches, or fuzz that looks suspicious at first glance. That usually points to a process mismatch, not a failed grow. These seeds simply behave differently from easier tray crops, so they tend to do better when I slow down, spread them more carefully, and give them a gentler start.
What makes these seeds different in a tray
The real issue is the gel they form after wetting.
In my trays, that slick coating makes seeds cling to each other, the tray surface, and even the cover, so distribution changes fast once water hits them.
Some small seeds sow quite normally; basil, chia, cress, and flax act differently because they turn tacky.
That tackiness affects three things right away: how evenly I can sow, how gently I water, and how much airflow helps the surface stay from feeling swampy.
A wet mucilage coat can look unusual before germination gets going.
What I watch for is whether each seed stays in its own gel halo or whether fuzzy growth starts bridging between seeds; that practical difference helps me read the tray calmly.
Start with a flat, even tray
Before I even open the seed packet, I make the tray surface boringly even. With mucilaginous seed, that little bit of prep saves me from chasing bare spots and dense clumps later. If the surface has dips, the gelled seed tends to collect there and stay there.
I fill the tray right to the corners, then press the mix down just enough to remove airy pockets. After that, I use my hand or a straight edge to smooth the top until it looks flat, not fluffy. I also like the surface already evenly moist, so the seeds can stay where they land instead of sliding into low spots.
My quick check looks like this:
- level from edge to edge
- no cracks, mounds, or deep finger marks
- moisture looks consistent across the top
When I’m thinking about how I set up trays for tricky seeds, this is the part that matters most. A clean, level surface usually means much less rescue work after sowing.
I water the tray before I sow
With these seeds, most of the moisture handling happens before they ever touch the tray. Once they wet and gel up, extra surface water can turn the top into a little slip-and-slide, and the seeds may drift, bunch up, or stick together.
I aim for a surface that is evenly damp but not shiny. If I see puddles, I give the tray a moment to settle, then smooth it again or dab the wet spots.
A quick check I use:
- the surface looks evenly dark, not patchy
- my fingertip feels moisture, but no water beads up
- there are no glossy low spots at the edges or center
That small adjustment up front usually makes sowing much calmer for me.
If I sow onto standing water, trying to spread the seeds later often makes the clumps worse. Fixing moisture first is usually the easier part.
I sow in light passes, not one heavy dump
I treat these seeds a little differently the moment they leave the packet: I keep them completely dry until they land on the tray. Once they pick up moisture, they start sticking to each other and to my fingers, and that is usually how clumps begin.
Instead of trying to cover the whole tray in one go, I scatter them in light passes. I move my hand across the tray, pause, then make another pass from a different angle. That gives me a better read on the surface and helps me avoid those dense little piles that look harmless at first but sprout into crowded patches.
I also aim for a lighter density than I would with non-mucilaginous seeds. It can feel a bit sparse in the moment, but in my trays the spacing usually pays off with more even germination and less patchiness later.
While the surface is still workable, I fix obvious gaps right away. I just drop a few dry seeds into the thin spots before anything has time to gel up. After that point, I try not to fuss.
What has helped me most is simple:
- keep the seeds dry
- sow in a couple of gentle passes
- leave a little breathing room
- correct gaps early, then stop
When I rush and pour on extra seed, I usually get more clumping, not better coverage. A calmer hand and slightly wider spacing tend to look better a few days later.
I stop before I flood the surface
Right after sowing is when I’m most likely to overdo it. The tray can look a little dry from above, and because these seeds have not fully gelled yet, it is very tempting to reach for a heavy spray. For me, that is usually how an even scatter turns into a sticky sheet.
I use the finest mist my bottle can manage and give just enough water to settle the seeds onto the surface. I’m not trying to re-water the whole tray here. If I see big droplets forming or little shiny puddles connecting, I stop and let the surface rest for a minute.
Then I cover the tray to hold humidity, but I make sure the cover is not touching the seeds. An inverted empty tray, a dome, or a loose lid can work if it leaves a bit of space above the surface. That small gap helps the seeds stay moist without getting pressed into a pasted layer.
Evenly damp, not glossy
Fine mist, not a spray stream
Covered above, not pressed down onto the seed surface
I uncover them earlier and keep the surface drier
Once I see steady germination, I usually stop treating the tray like it still needs a humid little dome. With mucilaginous seeds, that extra trapped moisture can turn helpful into messy pretty fast. I often crack the cover early, then remove it fully as soon as the seedlings can handle it.
From that point on, I try to keep the surface damp, not shiny. Instead of frequent misting, I lean more on bottom watering or very careful edge watering. That helps the roots get moisture without keeping the seed gel slick all day.
A little airflow matters more here than I first expected. I like a gentle fan nearby, not pointed hard at the tray, just enough to keep condensation from hanging around. If droplets keep forming on the cover or the tray smells heavy and wet, I take that as a sign to vent sooner.
A few things get my attention quickly:
- Condensation returning fast after venting
- Seedlings stretching or leaning, which usually means they need more air or closer light
- Crowded, matted patches that stay wetter than the rest of the tray
- A surface that looks slick or swampy instead of evenly moist
When I catch those signs early, the tray usually stays much calmer and easier to finish well.
If the top still glistens an hour after watering, I usually backed off too little. I aim for a surface that looks matte-moist, with roots hydrated but no standing sheen.
When trays look uneven
Why clumps?
I usually changed two variables. Next tray, I tweak only moisture or density.
Why bare patches?
A dip or heavy pass often starts them. I fix gaps only before seeds gel.
Is fuzz mold?
Sometimes not. If airflow clears it and roots look anchored, I keep watching.
How do I stop guessing?
I repeat one setup three times. Notes make patterns easier to see.
- One tweak Change one variable per tray.
- First checks I look for dips, shine, and stale air.
- Confidence boost I can practice on a simpler crop first.
The routine I repeat
My routine stays simple: level, pre-moisten, sow lightly, settle gently, uncover early. If a tray misses, I change one thing and rerun it.
For a confidence boost, I sometimes practice on a faster, easier crop before returning to basil or chia.

I like the idea of light passes, but step 3 still went sideways for me.
My chia looked evenly spread while dry, then after a few hours it kind of pulled itself into thicker bands. The tray was leveled, medium was moist, and I barely misted. Does that usually mean I still had the surface too wet, or is my seed density the bigger issue?
If it looked even while dry but shifted into bands after gelling, I’d first suspect the surface moisture or slight low spots rather than density alone. With mucilaginous seeds, even a small amount of extra surface water can let them migrate before they fully settle.
I’d try one tray with the same density but a slightly less glossy surface before sowing, and pay extra attention to flattening the tray edge-to-edge. If that fixes the banding, you’ve found the main variable.
This was the first explanation that made the “weird white fuzz” thing click for me. I kept treating basil like broccoli and then wondering why the tray looked haunted by day 2 😅
Pre-watering the tray before sowing helped a LOT. When I used to mist after, everything would drift into little slime islands.
Not gonna lie, I was a little skeptical about “flat, lightly firmed” making that much difference… but yeah, it does.
I used to patch bare spots constantly because the seeds would pool in tiny valleys I couldn’t even see at first. After taking an extra minute to level the tray, the whole sowing step got less chaotic.
Still hate sowing chia though lol.
This matched my experience almost exactly. The biggest lesson for me was that the problem wasn’t the seeds being tiny, it was the gel changing the whole watering game.
Once I stopped trying to fix unevenness by dumping on more seed, I got better results. Over-seeding was basically me creating my own future headache 😂
The part about uncovering earlier was huge for me. I was babying the tray under a cover way too long because I thought “more humidity = better,” but it just made the surface stay swampy.
Took the cover off sooner this week, added a little airflow, and the stand was way less matted. Not perfect, but honestly the cleanest basil tray I’ve had yet.
Same here. Keeping the lid on too long was my whole problem and I blamed the seed for months.
That’s a really common pattern. With these seeds, the cover helps at first, but if it keeps condensation hanging around too long, the surface can stay overly wet and the tray gets unstable fast.
Earlier uncovering plus gentle airflow usually does more for uniformity than trying to “rescue” things later.
Good article overall, but I wish there was more detail on what “minimal mist” actually means. One person’s tiny mist is another person’s accidental monsoon.
I think a lot of us overwater because the seeds look exposed and we panic. A visual cue section would be super helpful.
Fair point. “Minimal” is frustratingly easy to say and harder to demonstrate in text.
What I’m looking for is just enough moisture to settle the dry seeds onto the surface, not enough to create visible movement, pooling, or a shiny film across the tray. If the seeds start drifting or collecting, that’s already past the point I want.